Getting into Shopify is easy! Just sign up for the Shopify Partner Program – it won’t cost you a dime. This program gives you access to the Shopify platform, and you can create as many test stores as you want.
- How to create a shopify account?
Go on Shopify.com and signup with your account.

Now create shopify project with nextJS
your project and navigate to it in your terminal:
npx create-next-app
Install necessary packages:
npm install isomorphic-fetch dotenv
Once you’ve set up your Shopify store and created shopify project with next follow these steps to create API credentials: Access Your Shopify Dashboard: Log in to your Shopify account and access your store’s admin dashboard.
Navigate to Apps: In the left-hand sidebar, click on “Apps.”

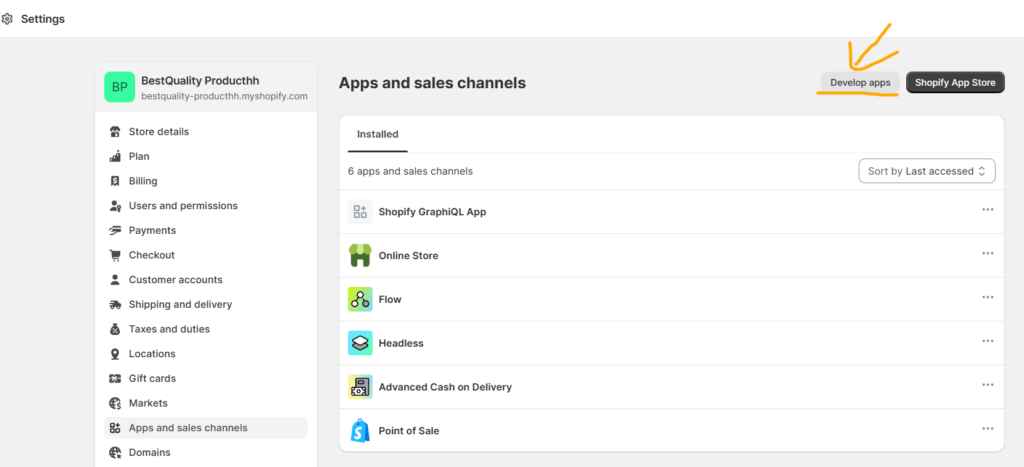
Proceed to the settings by clicking on ‘Apps and Sales Channels. And go tp Devlop apps.

Create App: In the upper right corner, click on the “Create app” button.

Fill in Details: Provide a name for your app. This can be a name that you’ll recognize. You can also enter your email address. Then, click on the “Create app” button.
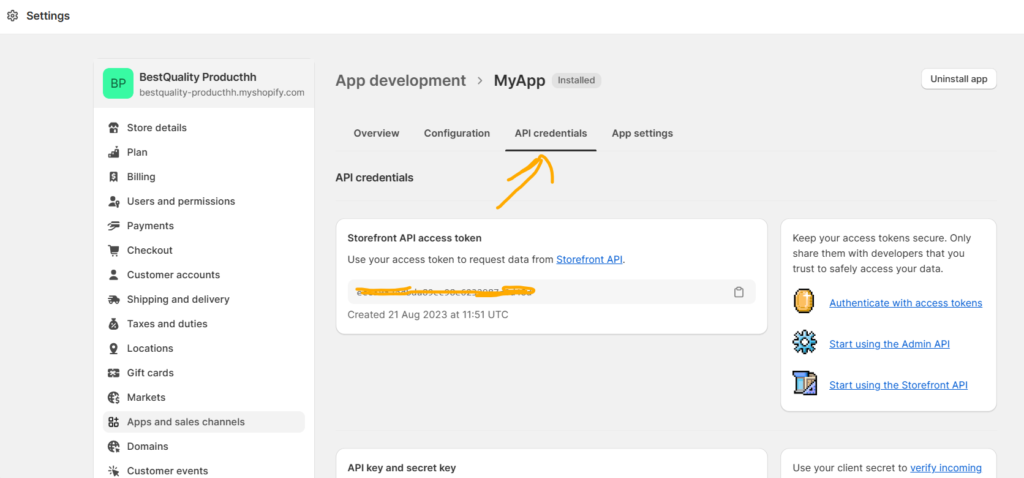
Credentials: After creating the app, you’ll be redirected to the app’s settings. Look for the “App credentials” section.
Generate API Keys: In the “App credentials” section, you’ll find your API key and API secret key. These are the credentials you need to interact with the Shopify API.
Copy Credentials: Click on the “Show” link next to the API keys to reveal the actual keys. Copy both the API key and API secret key to a safe place.

Set Up Shopify API Access
Create a .env.local file in your project root and add your Shopify API credentials:
SHOPIFY_STOREFRONT_ACCESS_TOKEN=your-access-token
SHOPIFY_STORE_DOMAIN=your-store-domain
Replace your-access-token with your actual Shopify storefront access token and your-store-domain with your store’s domain
Create GraphQL Queries
Create a lib/shopify.js file to handle Shopify API requests:
import fetch from 'isomorphic-fetch';

const SHOPIFY_STORE_DOMAIN = 'bestquality-producthh.myshopify.com';
const SHOPIFY_STOREFRONT_ACCESS_TOKEN = '5cca3e9ad0ec4655da43818c9c174b28';
const SHOPIFY_API_URL = `https://${SHOPIFY_STORE_DOMAIN}/api/2021-07/graphql.json`;

const fetchShopifyData = async (query, variables) => {
  const response = await fetch(SHOPIFY_API_URL, {
    method: 'POST',
    headers: {
      'Content-Type': 'application/json',
      'X-Shopify-Storefront-Access-Token': SHOPIFY_STOREFRONT_ACCESS_TOKEN,
    },
    body: JSON.stringify({ query, variables }),
  });

  const data = await response.json();
  return data.data;
};

export default fetchShopifyData;
Define GraphQL queries in your pages, such as pages/index.js:
import React from 'react';
import fetchShopifyData from '../lib/shopify';
import Image from 'next/image';

interface Product {
  id: string;
  title: string;
  images: { edges: Array<{ node: { originalSrc: string } }> };
}

interface HomeProps {
  products: Product[];
}

export default function Home({ products }: HomeProps) {
  return (
    <div>
      <h1>Shopify Products</h1>
      <ul>
        {products.map((product) => (
          <li key={product.id}>
            <h2>{product.title}</h2>
            {product.images.edges.map((imageEdge) => (
              <Image
                key={imageEdge.node.originalSrc}
                src={imageEdge.node.originalSrc}
                alt={product.title}
                width={200} // Adjust the width and height as needed
                height={200}
              />
            ))}
          </li>
        ))}
      </ul>
    </div>
  );
}

export async function getStaticProps() {
  const query = `
    query {
      products(first: 10) {
        edges {
          node {
            id
            title
            images(first: 1) {
              edges {
                node {
                  originalSrc
                }
              }
            }
          }
        }
      }
    }
  `;

  const data = await fetchShopifyData(query);
  const products = data.products.edges.map((edge: { node: Product }) => edge.node);

  return {
    props: {
      products,
    },
  };
}
Run Your Next.js Application
Start your Next.js development server:
npm run dev
Access your application in your browser at http://localhost:3000.

