Setting Up Sanity and Connecting Your Frontend Project
Open your web browser and go to https://www.sanity.io/. Login using your email credentials. Once logged in, you can create a new project.

or

After successfully logging into Sanity and creating your project, you will be directed to a new page. On that page, look for the button or link labeled “Let’s Go” and click on it to proceed.

1.What are you building?
2. Choose the appropriate option that best describes the type of project you are working on. For example, you might select “Website” or “Mobile App.”
What technology are you using?
3. Select the technology or framework you are using for your project. This could be options like “React,” “Vue.js,” “NextJS” “Angular,” or “Other.”
Select CMS technology:
- Choose the Content Management System (CMS) technology you prefer to use. Options might include “Sanity Studio,” “Headless CMS,” or “Custom CMS.”

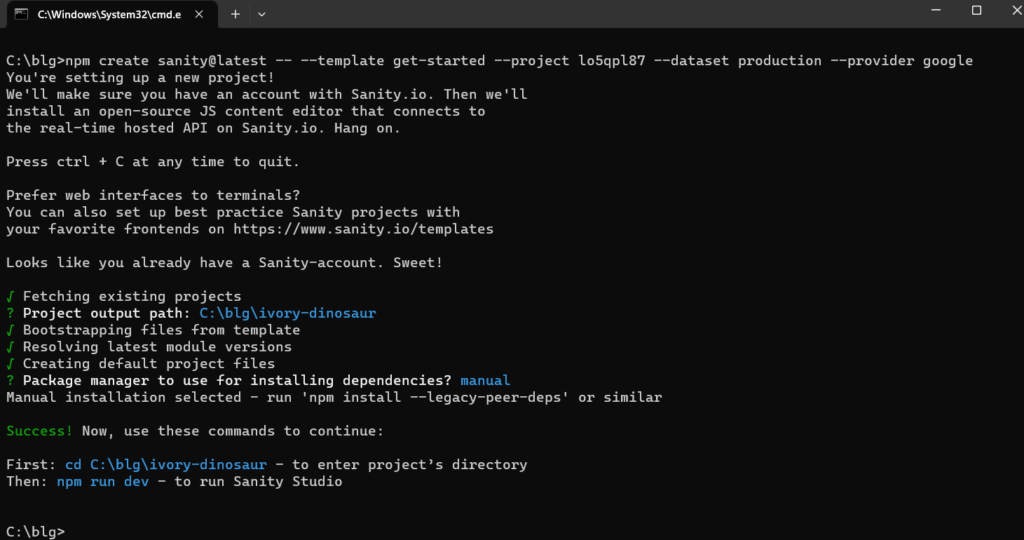
If you have made your selections according to your preferences, you will be directed to a page where you will find the code that needs to be copied and pasted into your terminal. This code typically includes commands or scripts necessary for setting up the project or integrating Sanity with your development environment.

Copy the code and paste in your terminal and follow this instruction.

Your Sanity Studio has been created successfully.
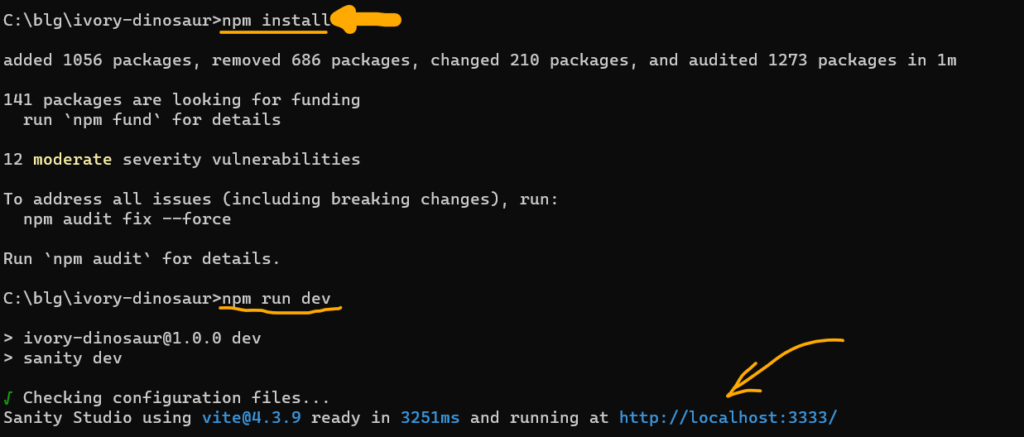
Follow these highlighted steps.

After completing the previous steps, open your web browser and navigate to http://localhost:3333/. The Sanity Studio will open in your browser, allowing you to access and interact with your created project.
To create your project using the npx create-next-app command and run it with npm run dev, follow these steps:
- Open your terminal application.
Run the following command to create your project:
npx create-next-app <project-name>
2. Replace <project-name> with the desired name for your project. This command will create a new Next.js project in a directory with the specified name.
Once the project is created, navigate into the project directory:
3. cd <project-name>
4. Replace <project-name> with the actual name of your project.
Next, install the project dependencies by running:
npm install
5. After the dependencies are installed, start the development server with the following command:
npm run dev
6. The development server will start, and you will see output in your terminal indicating that the server is running.
Open your web browser and visit http://localhost:3000. You should see your Next.js project running.
You can now begin developing your Next.js project and make any necessary modifications.
Now, open your Sanity project in Sanity Studio and proceed to create a schema for your project.open your schma folder create schema which type of component you want to create.
Now, open your Sanity project in Sanity Studio and proceed to create a schema for your project.
This is my promo.js schema.

Import and export this in your schema/index.ts in sanity project like this

To connect your frontend project with your backend Sanity project, follow these steps: Open your backend Sanity project in your preferred code editor.
Open the sanity-config.ts file. In the sanity-config.ts file, locate the variables or properties that specify the dataset and project ID.

To fetch data from Sanity, determine whether you want to render the data on the server or client side. For server-side rendering, use getServerSideProps in the specific page where you want to render the data. For client-side rendering, include the necessary code in the page to fetch the data using client-side techniques. Code is given below.

Put this code in index.tsx

The project has been successfully created and connected to Sanity Studio.

